
Station Name: PADIHAM[Source: Andy Hunt]
Padiham Station Gallery 1: 1890 - c1912
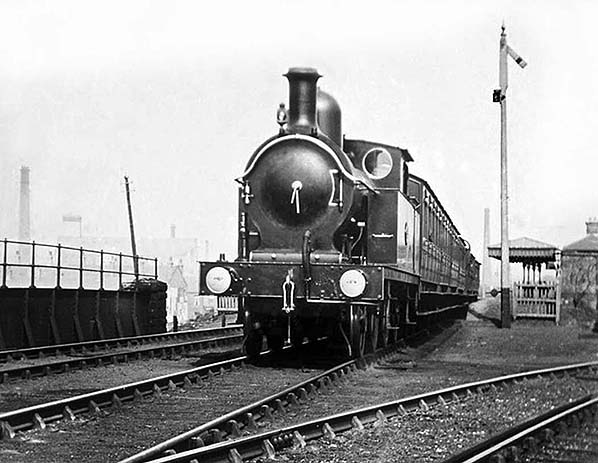 A photo taken in 1890, an L&Y class 5 stands just forward of the home signal. The bridge appears to be going over Mare Park Road to the west of the station; the line joining from the right gave access to the goods yard. The engine looks to be fresh out of the Horwich locomotive works; interestingly it doesn't have an engine number on it. It is possibly a promotion photo for the L&Y. The platform on the left is the up platform and the photo was taken looking east to Rose Grove. The train would have made its way along the loop line to Blackburn. A photo taken in 1890, an L&Y class 5 stands just forward of the home signal. The bridge appears to be going over Mare Park Road to the west of the station; the line joining from the right gave access to the goods yard. The engine looks to be fresh out of the Horwich locomotive works; interestingly it doesn't have an engine number on it. It is possibly a promotion photo for the L&Y. The platform on the left is the up platform and the photo was taken looking east to Rose Grove. The train would have made its way along the loop line to Blackburn.Photo from John Mann collection   1893 1:2500 OS map. Starting at the top right side, we can see the main running lines coming in. Just after crossing the weir a line splits off the up line, it in turn splits into two just before going over one of the bridges that spanned Station Road. One of these two lines runs the length of the goods yard and was the up refuge siding capable of holding 43 wagons. The other runs through the goods shed; both of these lines converge with the good yard sidings at the western end which in turn connect with the main running lines near the river Calder. Two pairs of sidings can be seen; the travelling Goliath crane moved along these sidings and could reach across all 4 sidings. Two long and one short siding can be seen nearest the gas works. These were the coal sidings. One small line comes off the shortest siding and runs to the gas works entrance. Once the sidings converge with the main lines the bridge over the river Calder is crossed. The platform buildings can be seen and the ground floor entrance hall building is connected with steep ramps leading to the platforms, a subway allowing access to the up platform ramp. The original two signal boxes (East and West) can be seen either side of the station, East is on the right hand side. Click here for a larger version 1893 1:2500 OS map. Starting at the top right side, we can see the main running lines coming in. Just after crossing the weir a line splits off the up line, it in turn splits into two just before going over one of the bridges that spanned Station Road. One of these two lines runs the length of the goods yard and was the up refuge siding capable of holding 43 wagons. The other runs through the goods shed; both of these lines converge with the good yard sidings at the western end which in turn connect with the main running lines near the river Calder. Two pairs of sidings can be seen; the travelling Goliath crane moved along these sidings and could reach across all 4 sidings. Two long and one short siding can be seen nearest the gas works. These were the coal sidings. One small line comes off the shortest siding and runs to the gas works entrance. Once the sidings converge with the main lines the bridge over the river Calder is crossed. The platform buildings can be seen and the ground floor entrance hall building is connected with steep ramps leading to the platforms, a subway allowing access to the up platform ramp. The original two signal boxes (East and West) can be seen either side of the station, East is on the right hand side. Click here for a larger version  1931 1:2500 OS map. The goods yard layout remains the same as the 1893 map, however the short third coal siding has been made into 2 longer sidings. The tramway that runs alongside the outer one runs all the way and directly connects the yard with the gas works. The 2 original signal boxes have been replaced by 1 box situated of the down platform at the Rose Grove end - this replacement happened in 1913. Just out of sight to the left, Padiham's power station was now built and in use. Trains for it would cross over the river bridge (on the left) and immediately run off the main lines to their left (or South as we look at the map). Click here for a larger version. 1931 1:2500 OS map. The goods yard layout remains the same as the 1893 map, however the short third coal siding has been made into 2 longer sidings. The tramway that runs alongside the outer one runs all the way and directly connects the yard with the gas works. The 2 original signal boxes have been replaced by 1 box situated of the down platform at the Rose Grove end - this replacement happened in 1913. Just out of sight to the left, Padiham's power station was now built and in use. Trains for it would cross over the river bridge (on the left) and immediately run off the main lines to their left (or South as we look at the map). Click here for a larger version. Padiham signal box shown here in red had 23 working levers and 1 spare giving 24 in total in 1961. It controlled the station area, access to and from the goods yard and the reception siding (exchange siding) for the power station. Freight trains that had to pin down wagon brakes for the trip down the 1 in 40 bank from Rose Grove (on the westbound up line) stopped at the home starter signal (signal No. 3) where they were released again. Access to Padiham power station was via the reception (exchange) siding. Coal trains would stop at the illuminated board at the western end of the reception siding, here they would telephone the power station to ask which one of their sidings did they want the coal wagons to be placed on. An empty train from the power station would use the run round reception loop, again the train would stop just beyond the exit of it and inform the signal box that it was ready to return. The signal box itself was located at the Rose Grove (east end) of the station's down platform. This box was a replacement (in 1913) for the two original ones which were either side of the down platform called East and West. This box closed 30 June 1969 after the line was singled over the two previous weekends. The track diagram is from March 1961. Padiham signal box shown here in red had 23 working levers and 1 spare giving 24 in total in 1961. It controlled the station area, access to and from the goods yard and the reception siding (exchange siding) for the power station. Freight trains that had to pin down wagon brakes for the trip down the 1 in 40 bank from Rose Grove (on the westbound up line) stopped at the home starter signal (signal No. 3) where they were released again. Access to Padiham power station was via the reception (exchange) siding. Coal trains would stop at the illuminated board at the western end of the reception siding, here they would telephone the power station to ask which one of their sidings did they want the coal wagons to be placed on. An empty train from the power station would use the run round reception loop, again the train would stop just beyond the exit of it and inform the signal box that it was ready to return. The signal box itself was located at the Rose Grove (east end) of the station's down platform. This box was a replacement (in 1913) for the two original ones which were either side of the down platform called East and West. This box closed 30 June 1969 after the line was singled over the two previous weekends. The track diagram is from March 1961.Copyright Chris Littleworth 
The layout of the buildings for Padiham station. 1 is the first floor station master's house, 2 the ground floor booking office and general waiting room, and stores etc. 3 The public entrance. 4 is the subway that gave access to the up platform ramp. 5, the ramp up to the down platform. 6, the other ramp leading to the up platform. 7, the down platform building. 8, the up platform building. 9, is platform level. 10, Street level. Finally 11, Stairs that gave access from the street to the station master's house
Drawn by Andy Hunt 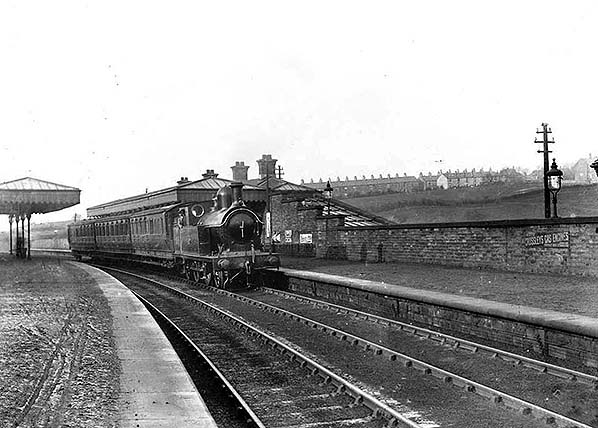
In the early years of the 20th century a Lancashire & Yorkshire Aspinall Class 5 2-4-2T stands at the down platform. One example of this class, No. 1008, has survived into preservation. This combination of tank engine plus three carriages was typical of the local passenger services right up to the last train on 30 November 1957. Note to the right of the train, behind the gas lamp, you can just see the glass-covered steep ramp going down to ground level. This view is from the Rose Grove end of the station.
Photo from Jim Lake collection 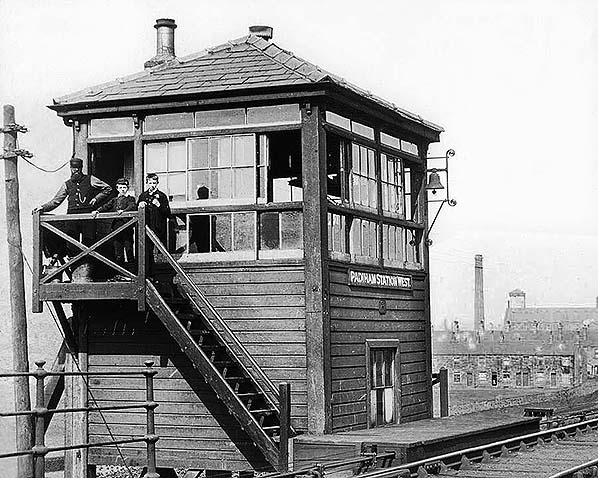 A great photo of one of the original signal boxes at Padiham, this one is of Padiham West box in the early 20yh century. It was constructed of wood and had a slate roof and was situated at the western end of the station area just before the line ran over the river Calder heading west towards Blackburn. This box along with the east one was removed in 1913 and replaced by one signal box located on the Rose Grove end of the down platform. A lovely photo of the signal man and two boys at the top of the steps. No details are given with regards to how many levers this box had.
Photo from Jim Lake collection 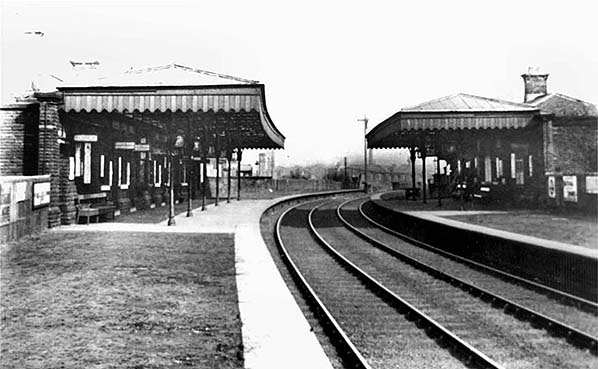 An Edwardian view of both station buildings. The platform on the left is the down platform. This platform had most of the facilities, whilst the up one had some waiting rooms. This photo is pre-1913, since in that year the original two signal boxes were replaced with just one on the down platform at the Rose Grove end. This view is from the Blackburn end. Note that the platforms and their buildings are elevated from ground level and that ash ballast covers the sleepers. The practice of covering sleepers with ballast was outlawed sometime around 1918 - 1919, very soon after the end of WWI. An Edwardian view of both station buildings. The platform on the left is the down platform. This platform had most of the facilities, whilst the up one had some waiting rooms. This photo is pre-1913, since in that year the original two signal boxes were replaced with just one on the down platform at the Rose Grove end. This view is from the Blackburn end. Note that the platforms and their buildings are elevated from ground level and that ash ballast covers the sleepers. The practice of covering sleepers with ballast was outlawed sometime around 1918 - 1919, very soon after the end of WWI.Photo
from JJohn Mann collection
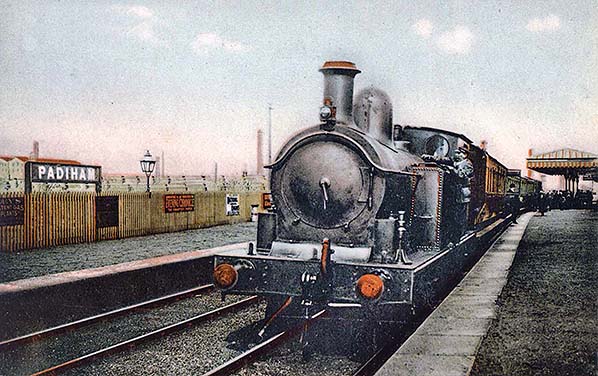 A colourised postcard of a Blackburn (westbound) train stands by the up platform at Padiham probably in the second decade of the 20th century. Passengers alight from the train while the driver checks out the water level in the left hand side tank of the engine. This engine is a Barton-Wright 0-6-2T class 22 tank engine. 82 of them were built for the L&Y railway company between 1877 and 1883. L & Y livery was Tan above the waist and Crimson Lake below. A colourised postcard of a Blackburn (westbound) train stands by the up platform at Padiham probably in the second decade of the 20th century. Passengers alight from the train while the driver checks out the water level in the left hand side tank of the engine. This engine is a Barton-Wright 0-6-2T class 22 tank engine. 82 of them were built for the L&Y railway company between 1877 and 1883. L & Y livery was Tan above the waist and Crimson Lake below.Copyright photo from John Alsop collection Click here for Padiham Station Gallery 2:
|
 The station buildings were stone-built with slate roofs and built on two levels. The lower level building had the station entrance, booking office, a waiting room, parcels office, an ashes store and WC. The first floor of this building was the station master's house, with three bedrooms, a parlour, kitchen, a pantry, scullery, a toilet, and a landing to the front door. A stairway leading from the street and a walkway just behind the down platform allowed access to the house. This building was on the Rose Grove (eastern) side of the station, and 30 or 40 yards from the platforms on the Blackburn (western) side.
 The awning edges of both buildings were painted with alternating colours, the same as the other stations on the North Lancashire Loop. The platforms were 581 feet long, only flagged for the length of both up and down buildings, and the platforms were built mostly on a curve starting at the Rose Grove end. When the station first opened to the public, although complete, it still wasn't painted. Both platform buildings had a sign “PASSENGERS MUST NOT CROSS the line EXCEPT BY SUBWAY”.
 The goods yard here became a coal only depot Monday 7th October 1963.
 The line through the former station area continued to see coal and occasional oil trains until July 1993 serving Padiham CEGB power station. The stockpile of coal was then taken away by train in July prior to the closure of the power station in September of that year. After the power station's closure the line became unused.
 Home Page