
THE 1886 LIVERPOOL EXCHANGE
|
By the late 1870s the Lancashire & Yorkshire Railway’s (LYR) passenger station at Liverpool Exchange could hardly cope with the volume of traffic that had built up. The solution was to rebuild the station and improve its approaches.
The new approach line opened on 12 December 1886. It was controlled by three signal boxes, Liverpool Exchange A, situated between the lines immediately north of platforms 5 and 6; Liverpool Exchange B, situated 237yd north of A signal box, on the east side of the line; and Liverpool Exchange Junction, situated 794yd north of B signal box, on the west side of the line between Maddrell Street and Sherwood Street. All three boxes were constructed by The Railway Signal Company, of Fazakerley. Liverpool Exchange A signal box was a brick-based structure and contained a 168-lever frame. It was inspected, with a temporary layout, on 2 December 1886 and opened to traffic, initially controlling platforms 1 to 5, on 12 December 1886. Platform 6, the middle siding and platform 7 were controlled from 23 February 1888 and platforms 8, 9 and 10 from 1 July 1888. The signal box also controlled a turntable siding and two stabling sidings on the west side of the line, a turntable siding on the east side of the line, just north of platforms 3 and 4, as well as four carriage sidings, north of the station, on the east side of the line. In addition, the box controlled five loco-release ground frames situated near the buffers between platform lines 2 and 3, platform lines 4 and 5, platform line 6 and the middle siding, platform line 7 and the middle siding and between platform lines 8 and 9. The ten platform lines and the middle siding merged to form eight lines by the point at which they passed Liverpool Exchange A signal box. At Liverpool Exchange B signal box the eight lines merged in to four. The four tracks were designated as the up and down slow and the up and down fast; the slow lines were on the western side of the formation. Liverpool Exchange B signal box was an all-wood structure mounted on a steel gantry, supported at the rear by three brick pillars, and it contained a 136-lever frame. It was inspected, with a temporary layout, on 2 December 1886 and opened to traffic ten days later on 12 December. The box controlled the merging of the eight lines out of Exchange down to the four up and down slow and up and down fast lines. It also controlled a junction to the goods lines and, until 1898, sidings at the south end of Great Howard Street goods yard. In addition, it controlled the north end of three of the four carriage sidings, north of Exchange station, on the east side of the line, the most easterly siding passing beneath the gantry structure of the signal box. Liverpool Exchange Junction signal box was an all-wood structure, but it is not clear how it was supported, as there are no known photographs of the structure. It was either mounted on a structure from street level, or, less likely, on a structure fastened to the side of the viaduct. The signal box contained a 56-lever frame and controlled the junction between the new, four track, line in to Liverpool Exchange and the old main line, via Great Howard Street, which had been reduced to two, goods-only, running lines and two through sidings, one on each side of the running lines. Junctions between fast and slow lines were also controlled, making it possible to route trains in or out of Exchange via slow or fast lines. On 8 March 1903 work began on the electrification of the 1886 approach lines using the third rail system at 630 volts DC. The works were completed by 22 March 1904 when passenger-carrying electric trains were introduced. All four of the lines were electrified. Colour-light signalling installation was commenced at Liverpool Exchange in 1937, but was halted due to the outbreak of the Second World War.
By May 1941 Liverpool Exchange Junction signal box was replaced by a new LMSR box. This was an all-wood structure and had a 60-lever LMSR REC frame. It was 3 March 1941 before the up slow line reopened - to Great Howard Street goods yard only - and 24 March 1941 before a temporary bridge allowed reopening of the slow lines in to Liverpool Exchange, initially for EMUs only and small steam locos on Sundays. On 3 May 1941 Liverpool Exchange station was bombed again and part of the roof and the west side offices were destroyed. On 4 May the temporary bridge that had replaced the destroyed Bentinck Street arches was destroyed in an air raid and Exchange and Great Howard Street stations were cut off again. On the same day Exchange station was bombed again and part of the station, including the carriageway, and the rest of the roof were destroyed. A line to Great Howard Street goods yard was reopened on 22 June 1941 and the up slow line in to Liverpool Exchange station was reopened, to platforms 5 to 7 only, on 6 July. The fast and slow lines were restored from Sandhills to Liverpool Exchange Junction on 22 March 1942 and from Liverpool Exchange Junction to Exchange station on 2 May 1942. The junction at Liverpool Exchange B signal box onto the Great Howard Street goods lines, was never restored after the war.
By 1957 Liverpool Exchange No.1 signal box had developed structural problems and it was decided to replace it with a new box. This opened at the end of 1962 and was a BR LMR Type 15, all-wood, structure containing an 85-lever BR LMR frame. In September 1964 the lines in to Great Howard Street goods closed and Liverpool Exchange Junction was taken out of use. The signal box remained in use until temporary closure in 1966. On 5 March 1967 platforms 1, 2 and 3 at Liverpool Exchange were closed. On 9 September 1968 Liverpool Exchange Junction signal box temporarily reopened as a block post, with all points removed. This was to shorten the block section, as Sandhills No.1 signal box had closed. Liverpool Exchange Junction box ceased to signal the fast lines on 5 July 1969, being replaced with intermediate block signals worked from Liverpool Exchange No.1 and Sandhills (formerly No.2 ) signal boxes. On 27 July 1969 Liverpool Exchange Junction signal box closed and intermediate block signals were installed on the slow lines, worked from Liverpool Exchange No.1 and Bootle Junction boxes. On 6 May 1973, in preparation for the construction of the new underground link line, platforms 8, 9 and 10 of Liverpool Exchange station, were closed. On 16 December 1973 the slow lines from Liverpool No.2 box to Sandhills were closed and a new junction, north of Sandhills station and worked from Liverpool No.1 box, was installed. Liverpool Exchange station was closed to rail traffic on 29 April 1977. Liverpool Exchange No.1 and No.2 signal boxes were officially manned, for equipment removal, until 07:00 hours on 2 May 1977, the new link line being brought in to use, at the former site of Liverpool Exchange Junction, along the old Great Howard Street goods lines. After closure the ironwork of the 1886 lines was removed for scrap leaving only the brick-arch sections at the northern end of the route. They could still be seen in 2015. Special notice and diagram from the Tony Graham collection. The 8D Association - Dedicated to promoting the history of South Lancashire and North Cheshire railways. Web Site Sources:
Click here to see Liverpool Great Howard Street passenger station Click here to see Great Howard Street Goods station Click here to see Liverpool Exchange |
 The new approach line was described in the 1882 Act as the ‘Liverpool Loop Line’. It was 37.76 chains in length and passed to the east of the original route into Liverpool Exchange. The line deviated from the original line at what became known as Liverpool Exchange Junction, and it rejoined the original route just south of the upper level of the Great Howard Street goods station. The section of line from Great Howard Street into Exchange was completely rebuilt. The line was four tracks wide between Liverpool Exchange Junction and the Great Howard Street Junction but widened to the south of that point to accommodate the lines that fanned out into the rebuilt station’s ten platforms as well as a number of sidings. The entire route of the 1886 line was elevated either on brick-arch or iron viaducts. There were also a number of bridges over streets and over the Waterloo Goods branch of the London & North Western Railway (LNWR). The contract for the construction of the line went to Monk & Newall. The brickwork cost £67,667 and the ironwork cost £84,479, but part of that cost was for the station.
 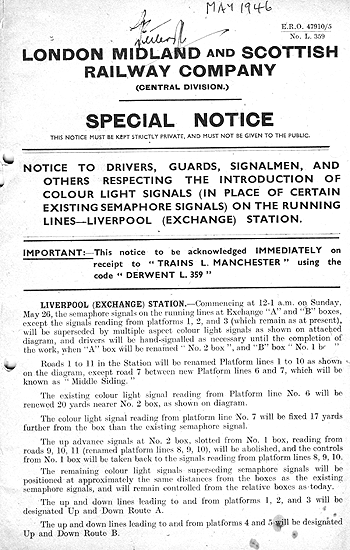 During the Second World War the 1886 lines were damaged on a number of occasions. The first incident occurred in the evening of 20 December 1940, when the roof of Liverpool Exchange station was damaged by bombs. The same evening a further five bombs damaged twenty coaches and the lines between Liverpool Exchange B and Liverpool Exchange Junction signal boxes. At 12.15am on 21 December 1940 a bomb destroyed five 30-foot arches near Liverpool Exchange Junction, at Bentinck Street. This severed all lines into Liverpool Exchange and Great Howard Street goods yard. Overnight, from the 21 to the 22 December 1940, Liverpool Exchange Junction signal box was destroyed and Liverpool B and Great Howard Street signal boxes were damaged. Great Howard Street signal box was closed and replaced with a ground frame, but Liverpool Exchange B signal box was repaired. Liverpool Exchange station was also damaged at the same time.
 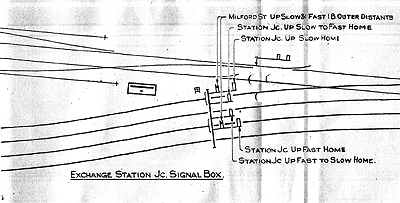 On 26 May 1946 the colour-light signalling at Liverpool Exchange was brought in to use and Liverpool Exchange A signal box was renamed No.2, whilst Liverpool Exchange B box was renamed No.1. Platforms 1,2 and 3 remained semaphore-signalled and Liverpool Exchange Junction signal box had colour-light signalling only on the down lines in to Liverpool Exchange.
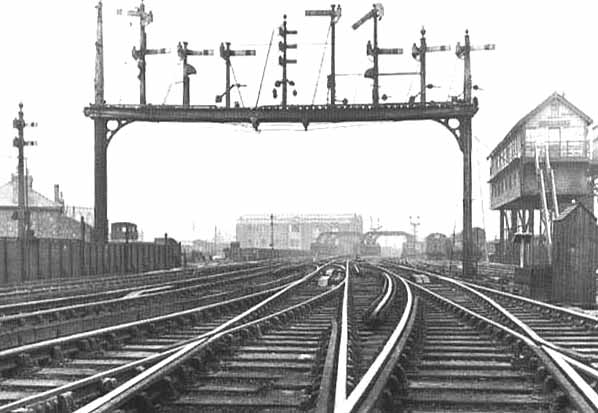
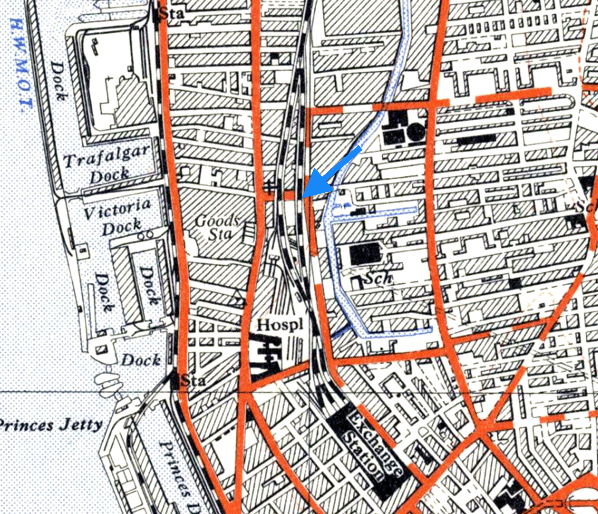
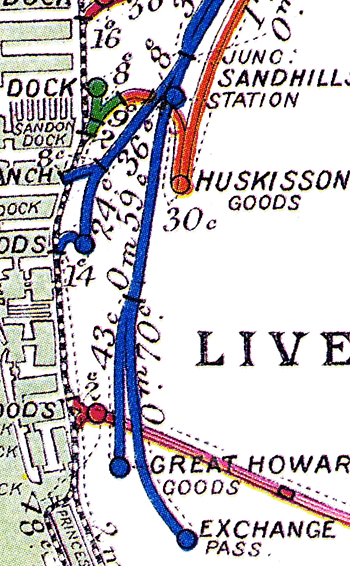
The 1886 Liverpool Exchange approach line indicated by the blue arrow shown on a 1:25,000 scale map from 1953. The 1848 line is seen to its left.
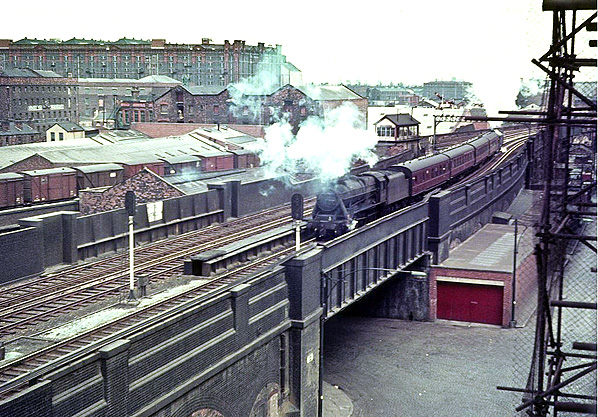
Looking north towards Liverpool Exchange Junction in the early 1960s. The 1886 Liverpool Exchange approach lines are in the foreground. They diverged from the original line at this point. The original 1848 route into Liverpool can be seen to the left with box vans stabled on it.
Photo by Ted Baxendale from the Kerry Parker Flickr photostream
old20.jpg)
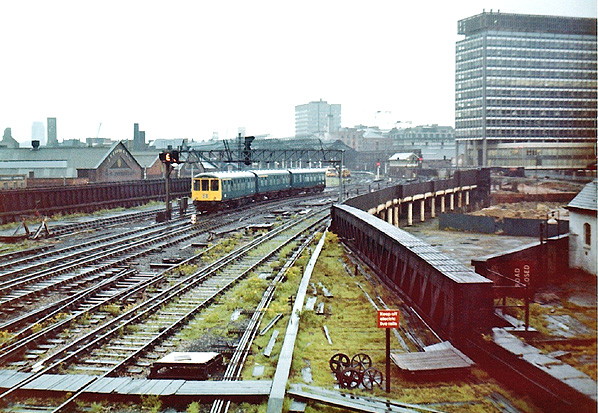
A view south towards Liverpool Exchange station in the early 1960s. A northbound train is seen on the up fast track of the 1886 lines.
Photo by Ted Baxendale from the Kerry Parker Flickr photostream
old16.jpg) The 1886 Liverpool Exchange approach lines, looking north in the summer of 1976. The view was taken from the Liverpool Exchange No.1 signal box which was built on the trackbed of the original line. In the distance, to the left, the route of the original line can be seen.
The 1886 Liverpool Exchange approach lines, looking north in the summer of 1976. The view was taken from the Liverpool Exchange No.1 signal box which was built on the trackbed of the original line. In the distance, to the left, the route of the original line can be seen.
Photo by Tony Graham
old18.jpg)
Looking north along the 1886 Liverpool Exchange approach lines in the summer of 1976. The lines to the left were the up and down slow lines and they were out of use by this time.
Photo by Tony Graham
On a Friday in summer 1976 a DMU failed at Liverpool Exchange. The next day a Class 40 locomotive was summoned to remove the DMU to Allerton depot in the south of the city. In this view looking north the DMU is seen being towed away along the 1886 approach lines. It would have travelled via Kirkby and Wigan to reach its destination.
Photo by Tony Graham
 The 1886 Liverpool Exchange approach lines looking south from Liverpool Exchange No.1 signal box in summer 1977. In the distance Liverpool Exchange station can be seen. The land to the right of the approach lines is the site of the Great Howard Street goods station lower yard.
Photo by Tony Graham
.jpg) A surviving section of the 1886 Liverpool Exchange approach lines at Whitley Street looking south on 30 March 2015. The iron bridge span had been removed a few years after the line closed.
A surviving section of the 1886 Liverpool Exchange approach lines at Whitley Street looking south on 30 March 2015. The iron bridge span had been removed a few years after the line closed.
Photo by Paul Wright
.jpg) Looking north along Love Lane on 30 March 2015. Surviving sections of the 1886 Liverpool Exchange aaproach lines can be seen stretching off into the distance. The 1848 line can be seen to the middle left. The 1848 line has carried the Merseyrail Northern line since 2 May 1977.
Looking north along Love Lane on 30 March 2015. Surviving sections of the 1886 Liverpool Exchange aaproach lines can be seen stretching off into the distance. The 1848 line can be seen to the middle left. The 1848 line has carried the Merseyrail Northern line since 2 May 1977.
Photo by Paul Wright
.jpg)
The site of Liverpool Exchange Junction looking north on 30 March 2015. The green ironwork is the point at which the 1886 lines merged with the original route of 1848.
Photo by Paul Wright
To see more photos of the 1886 approach lines click here
Click here to see photos of
Liverpool Exchange No. 1 signal box
 Home Page
| Last updated: Sunday, 21-May-2017 14:32:40 CEST |
© 2004-2015 Disused Stations
|