[Source: Nick Catford] Beddington Lane Gallery 2:
1925 - October 1967
halt_old9.jpg)
In 1925, two years into Southern Railway days, an unidentified ex-LBSCR Class D1 (or 'D Tank') 0-4-2T waits at Beddington Lane. The train is the usual 2-car push & pull set and probably either set 981 or 982. At the far end of the platform is a bi-directional signal post bearing three arms. Of those one is Beddington Lane's Down Home, one is the Up Starter but the purpose of the third is unclear - it might be Mitcham Junction Up Distant.
Photo
by Benjamin William Horton
halt_old10.jpg) In 1925, another unidentified ex-LBSCR Class D1 (or 'D Tank') 0-4-2T departs across Beddington Lane bound for West Croydon. On the right, the milepost states ¾-mile from Mitcham Junction. The lamp on the left was no doubt for the benefit of persons using the side gate and there was a similar lamp opposite and adjacent to the signal box. In 1925, another unidentified ex-LBSCR Class D1 (or 'D Tank') 0-4-2T departs across Beddington Lane bound for West Croydon. On the right, the milepost states ¾-mile from Mitcham Junction. The lamp on the left was no doubt for the benefit of persons using the side gate and there was a similar lamp opposite and adjacent to the signal box.Photo by Benjamin William Horton halt_old11.jpg)
Beddington Lane signal box and level crossing in 1925. This is the original box which another, larger box on a brick base would replace in the same position in May 1930. The level crossing was operated from the signal box and a mirror, or mirrors, provided to enable the signalman to check for road traffic. The signal, adjacent to the box, still had a single arm at this time. It was to become a 3-arm bracket signal with two ringed loop/siding arms to control sidings east of the station.
Photo by Benjamin William Horton halt_old3.jpg) In 1929 an ex-LBSCR Class D1 waits at Beddington Lane. The headcode disc indicates that its destination is West Croydon.
Photo by O J Morris halt_old6.jpg)
In this view from 1930 the original signal box pictured above has just been replaced by this new large box. The singl- arm signal has also been replaced by a 3-arm bracket signal to control sidings east of the station. The Stroudley D1 class were built for suburban passenger work but in time were relegated to secondary duties as larger locomotives became more desirable. A total of 125 D1s were between 1873 and 1887. Conceived in part as 'beefier' versions of the 0-6-0 Class A1 (the 'Terriers'), they were powerful for their size and had roughly twice the tractive effort of Class A1. One oddity with the D1 was its trailing wheels being not much smaller than the driving wheels, giving the visual impression of an 0-6-0 minus rear coupling rods. The class 'did its bit' during WWII with nine being adapted as fire engines at London motive power depots while six more were loaned to the LMS and saw service in Scotland for a time. Despite withdrawal commencing as early as 1903, seventeen members of the class were to survive to see British Railways. None received BR numbers. The final class member with BR, the former No.284 Ashburnham (all the class bore names originally) bowed out in December 1951 after a spell in departmental service as No.701S, otherwise had it survived longer in capital stock it would have become No.32284. The very last member in service was, however, the former No.357 ‘Riddlesdown’ which as Southern Railway No.2357 was sold to the Whittingham Asylum Railway, Lancashire, in 1947. She gave good service for several years trundling along the branch which connected the asylum to the Preston - Longridge line until laid-up with boiler defects in late 1955/early 1956 and dismantled alongside Whittingham's engine shed. She was replaced by an ex-Bolton gasworks sentinel which worked the line single handed until closure in June 1957. The remains of No.2357 were scrapped, believed on site, when the line was dismantled. She had been one of those adapted for fire fighting during WWII.
halt_old16a.jpg) A Class C2X 0-6-0 crosses Beddington Lane on its exit from the up side loop with a mixed goods train for Wimbledon. The train has come either from New Cross Gate or West Croydon and the signalman is about to exchange single line staffs with the crew. On a larger version of this image a BR smokebox numberplate can be seen, unreadable, but there is no shedplate fixed to the locomotive. This suggests a date for the photograph of no earlier than 1948 and probably no later than 1951. The up side loop, 1026ft long, had a second loop, 675ft long, and from this diverged a large number of sidings all with points facing in the down direction and within which were two further loops. Adjacent to the up side loop was a 'parachute' water tower and it is just about visible in the haze above and slightly left of the rear of the train. The signal bracket is described elsewhere. The 'Beware of Trains' sign, a familiar warning all over the network, here applied particularly to alighting passengers who needed to cross the track to access Beddington Lane on the south side of the railway. The board bearing the number '2' was a Car Stop indicator informing drivers where to stop the front of their 2-car EMU sets. Car Stop boards are still in use today and for a range of train lengths. The platform was still gas lit at this time and a number of Sugg 'Littleton' lamps can be seen; beside the gate on the right; directly ahead of the camera; on the left and complete with Southern 'Target' nameboard. The lamp standards have proved difficult to identify but appear, perhaps unsurprisingly, to be to a LB&SCR design. Assuming original to Beddington Lane, they once supported casement lamps but were later given 'swan neck' brackets for suspended lamps as seen here. This style was a familiar sight across the Southern network and elsewhere. These characterful lamps were to be replaced at Beddington Lane by the Southern's concrete standards and electric lighting sometime in the mid 1960s. To the right some typical 1930s bay windowed semi-detached houses can be seen with, in at least one case, a garage. Let down by their small kitchens, as built, they were nevertheless well built houses and today, especially in Southern England and where handy for commuting, as here, are very soughtafter. The C2X class locomotives were Marsh rebuilds of the LB&SCR Billinton C2 class. The main differences were the larger boilers and extended smokeboxes of the rebuilds. A few had two domes and in this guise looked slightly odd but not ungainly. All the unrebuilt C2s had gone by 1950, by which time only three remained, while the last of the C2X rebuilds bowed out in February 1962.
Photo from Jim Lake collection halt_old2.jpg)
2-WIM was the designation given, by Southern Railway, to a small fleet of electric multiple units, dedicated for use on the West Croydon to Wimbledon Line. The 2-car Wimbledon stock, (numbers 1809–1812) units were rebuilt in 1929, from former Trailer First cars, originally used in ex-LBSCR AC electric SL stock. Originally these units had some First Class accommodation in the Driving Motor car, but this was later declassified to Third Class only. The units were numbered 1909–1912 before 1936, when those numbers were reused for new 2-BIL units. Unit 1810 is seen at Beddington Lane in the 1930s. Note the man at the top of the telegraph pole.
Copyright photo from Paul Laming collection halt_old4.jpg)
2-WIM until 1810 is again seen at Beddington Lane in October 1954 shortly before withdrawal. All four units were withdrawn in 1954, and subsequently scrapped. Beddington Lane's platform was 200ft long and could easily accommodate the 2-WIM, 2-SL and later 2-EPB and Class 456 units. It could not, however, accommodate 4-car units. The Southern also once had some 3-car suburban EMUs but these could not work the West Croydon - Wimbledon line even though platforms could accommodate them. The conductor rail can be seen to the right of the running rails. It was and still is normal practice to place conductor rails on the side away from platforms. The original third-rail traction voltage as applied to the former LB&SCR routes was 660V DC, this being the system used by the L&SWR and which was adopted by the Southern Railway. Other parts of the Southern system used 600V DC but ultimately 750V DC was standardised upon throughout, the change occurring from 1955 onwards.
Photo by D. Cullum 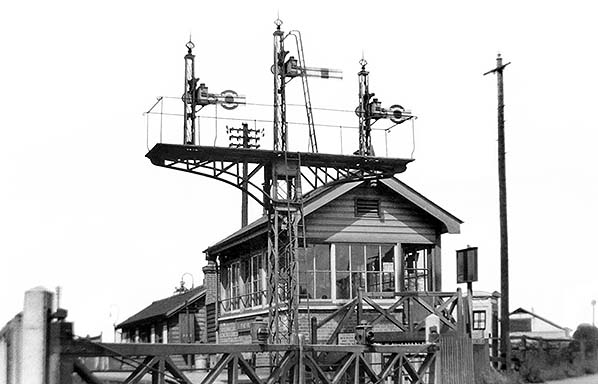 Beddington Lane seen from the level crossing and looking towards Mitcham Junction, sometime after 1933. Dominating the scene is the impressive signal bracket which applied to trains heading in the West Croydon direction. The taller, central, dolly applied to the running line while the other two, with ringed arms, applied to the sidings which branched off beyond the level crossing. The bracket survived well into British Railways days but eventually lost the signal for trains branching to the right - the left hand dolly in this view - as that siding was taken out of use. Today, where sidings once branched off to the left beyond the level crossing trams now operate as they skirt around the northern side of Therapia Lane tram depot which straddles the former railway trackbed. Fixed to the signal box steps is a Southern Railway sign stating 'Danger Don't Touch Conductor Rail'. Whilst this is, one would have thought, obvious, such warnings were and still are primarily about railway company liability. Keen-eyed readers may notice the telephone kiosk on the right. It is very interesting in that it is a GPO K5 (Kiosk No.5). These were lightweight kiosks, believed of plywood covered by steel sheeting, and designed to be portable for temporary use at, for example, exhibitions and fairs. Produced only in 1933 - 4 it is thought very few were made and today the K5 is the only one of the range of GPO 'phone boxes' of which there are no known survivors. The sole example which does exist is a modern replica. How this particular K5 came to be at Beddington Lane is not known, nor is it known if it was working - despite being adjacent to a telegraph pole - as the K5 was not designed for use as a permanent outdoors fixture. One possible answer might be that the kiosk was indeed installed temporarily in connection with Mitcham Fair which from 1924 was held on nearby Three King's Piece (Mitcham Common) as is now Mitcham Carnival.
Photo from John Mann collection halt_old1.jpg) Looking north-west from Beddington Lane level crossing towards Mitcham Junction in March 1961. The object on the post to the right of the signal box is a mirror to enable to signalman to view the road to the left of the camera before closing the gates. The gates were operated from a wheel in the signal box, with side gates secured by chains connected to the main gates and which were pulled taut as the main gates swung across the road. The telephone kiosk seen in the picture above has gone. The
station is gas-lit. Photo by Ben Brooksbank lane21.jpg)
The single platform at Beddington Lane Halt in August 1967; the motorbike presumably belongs to the signalman. Electric lighting has been installed within the last five years, using Southern Railway-style concrete standards, possibly salvaged from another station. The cranes are in a plant-hire depot immediately behind the stationmaster's house. The depot has now gone and the site is part of the Beddington Lane Industrial Estate.
Photo by Graham Larkbey halt1.jpg)
Looking south-east along the single platform at Beddington Lane Halt in October 1967. A public footpath runs alongside the track between the line and the Scientific Instrument Works. This footpath has recently been closed at the triple-arch Hundred Acre Bridgeover the Mitcham Junction to Sutton line. Users of Hundred Acre Bridge have been campaigning against its threatened demolition by Network Rail. In 2011 both ends of the footpath were blocked. Note that the signal on the right side of the signal bracket has now been removed. The typeface used on the BR nameboard is Transport Medium – used on British road signs – rather than Gill Sans which was officially adopted in 1948 for use on British Railways signage; for unknown reasons the Southern Region briefly adopted Transport Medium , probably in the early 1960s. The totem nameplates at Beddington Lane Halt use Gill Sans so were presumably installed at a different time.
Photo by Nick Catford
 Home Page Home Page
|